How to install eSIM on Iphone?
(Automatic Method)
The funny thing is, eSIMs are the easiest thing in the world to install. Yet, we hear it often enough from our customers all over the globe: “how do I install my Selenify eSIM?” or “I’ve installed the eSIM, now what?” Actually there are several steps involved in the eSIM installation process. But fear not, it’s super easy and takes just 5 minutes to install. Here we will break down the steps, and get you connected right away! Let’s get into it!
Check Compatibility Before Start
Ensure your iPhone supports eSIM (iPhone XR, XS, XS Max, or newer). Check here for the latest and most updated list of eSIM compatible smartphones. New eSIM-compatible models are released every quarter so check back often.
Check eSIM Compatible DevicesStep 1. Purchase an eSIM Plan from Selenify

- Visit Selenify’s website: Go to the homepage > Plans
- Browse Plans: Look for options to purchase an eSIM plan (likely under a "Shop" or "Plans" section).
- Select a Plan: Choose the plan that best fits your needs.
- Provide Your Email: Enter your email during the checkout process, where you'll later receive the activation details.
- Complete Purchase: Proceed to payment, and you'll receive an email confirmation with your eSIM details shortly after.
Step 2. Receive Your eSIM Activation Email

Selenify will send you an email with:
- A QR code for activation.
- Optionally, an SM-DP+ address and activation code for manual setup.
Step 3. Install the eSIM on Your iPhone
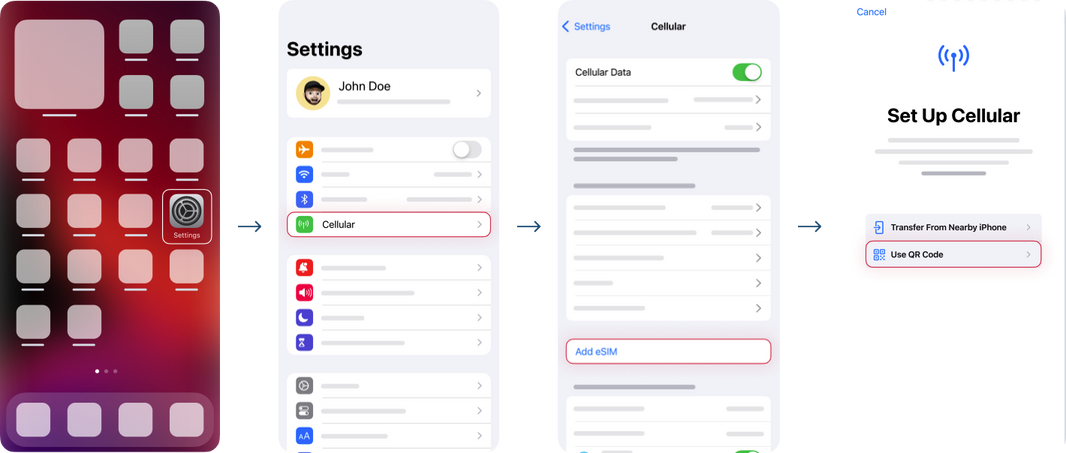
- Open Settings.
- Go to Cellular.
- Select Add eSIM.
- Select “Use QR code” way to set up cellular.
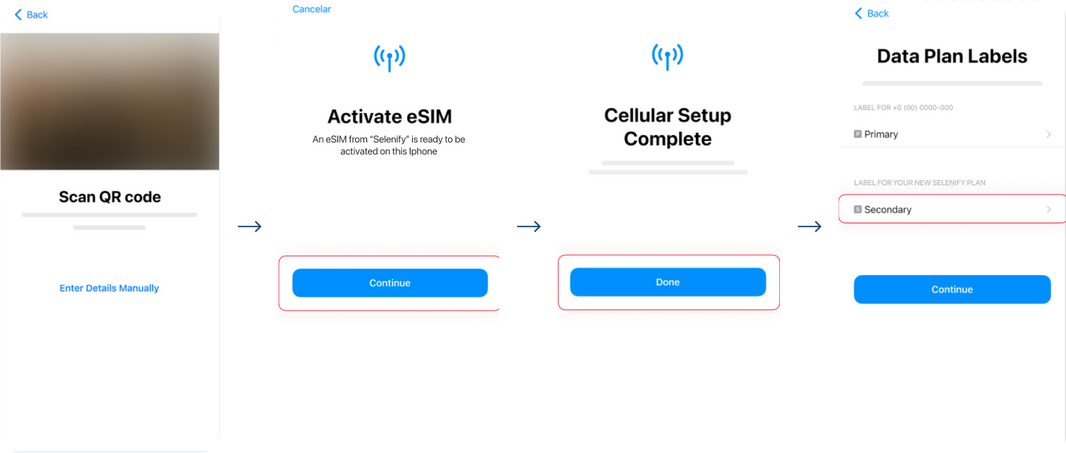
- Scan the QR code from the activation email using your camera.
- If needed, select Enter Details Manually and input the SM-DP+ address and activation code. Check the tutorial for the manual installation.
- Tap Continue and wait.
- The installation is complete, tap Done.
- Select your new Selenify eSIM and rename it. Then tap Continue.
Step 4. Activate your eSIM at the destination
Activate only at your destination.
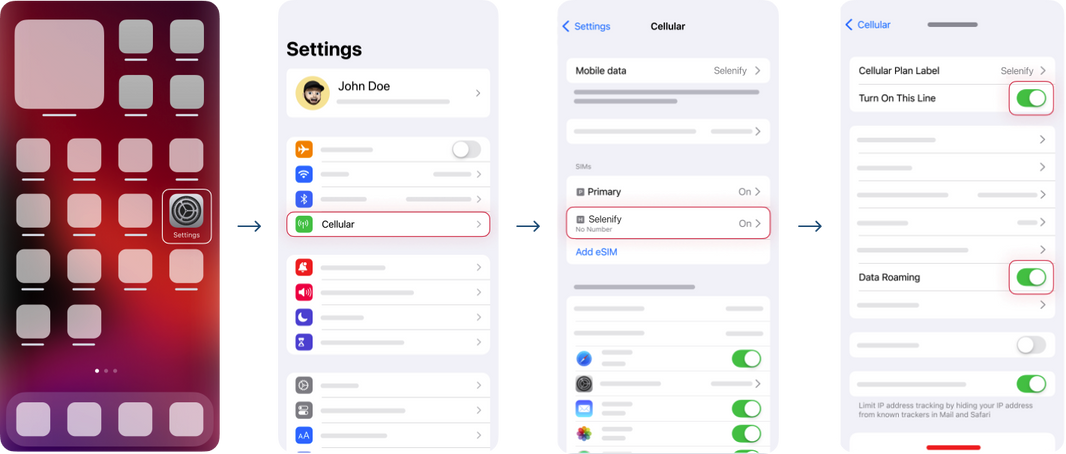
- Go to Settings.
- Go to Cellular.
- Select your Selenify eSIM.
- Turn on Data Roaming.
Step 5. Test Your eSIM Connection
Restart your iPhone. Ensure signal bars appear, then test the connection by making a call, sending a message, or using mobile data.
Final Thoughts
Hopefully this has been a helpful guide on how to install an eSIM and how to top-up data. See how easy that was? When was the last time it took you just 5 minutes to install… anything? Don’t wait and join the eSIM revolution with Selenify today. As always, we wish you the best on your travels.
Related Articles
No related articles found